Day 28: Multi-Site Mode
30 Days of FrameFlow
About Multi-Site Mode
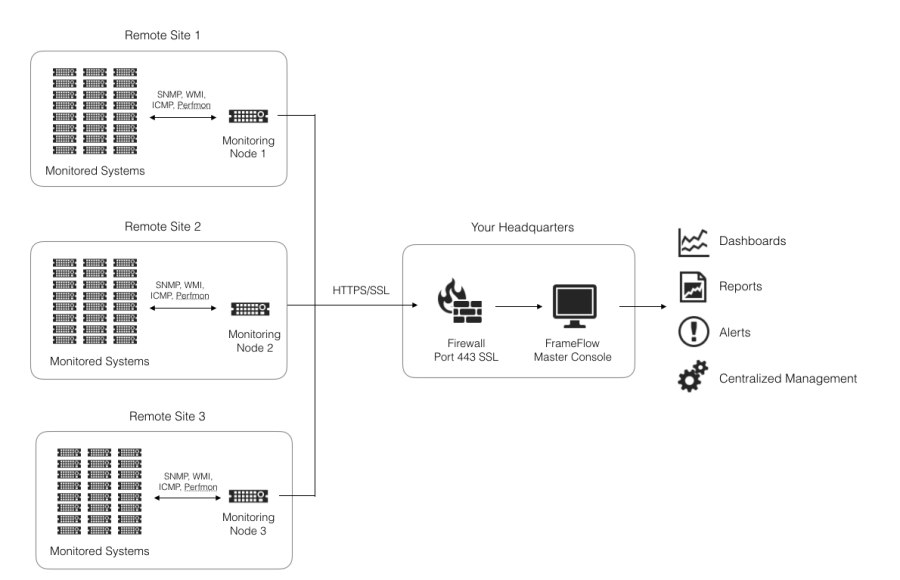
By default, FrameFlow installs in single-site mode, but for organizations with the main headquarters in one place and different secondary locations in another, multi-site mode is needed. FrameFlow's multi-site mode will aggregate data from all of your locations onto a single monitoring interface so you can stay on top of everything no matter where you are. Today, let's learn how to deploy remote nodes and monitor systems at different locations with FrameFlow.
Multi-Site Mode Features and Benefits
With FrameFlow's multi-site technology, all monitoring is done at the remote site and only the results are sent back to the master console, making the entire process much faster and more secure. The master console takes the results from its data gathering and uses them to populate dashboards, generate reports, and send alerts about any conditions that may require attention. You can also compartmentalize your multi-site installation based on location with user roles. This way, users in one location will log in and see only the devices, event monitors, and dashboards that are relevant to their location.

Setting Up Multi-Site Mode
The first thing you need to do to set up a multi-site installation is head to the Tools section of FrameFlow. Select the "Download Remote Node Setup" option. Once you've downloaded the remote node setup program, run it. Choose a setup location for your remote node, launch the config utility, then when you get to the instruction that says "Select the installation type", select "Remote Node" from the dropdown menu.

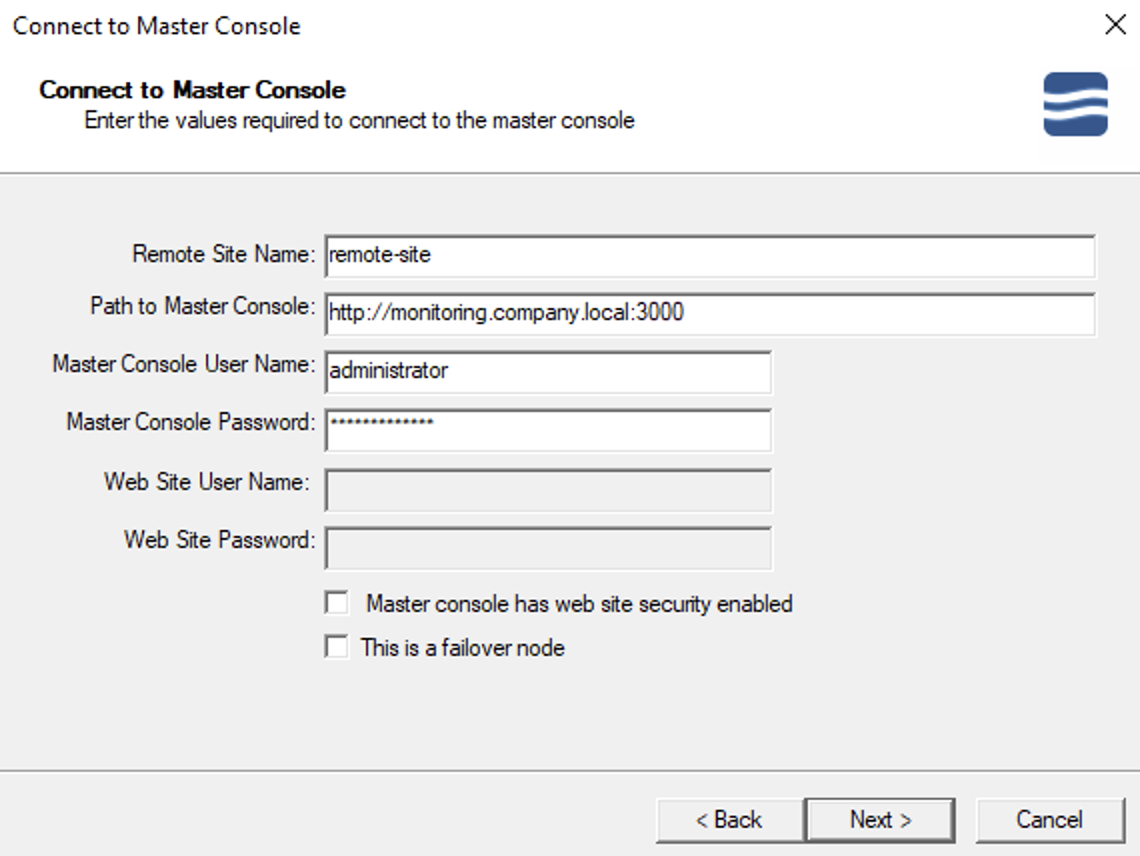
You'll then be prompted to add a name for the remote node, the path back to the master console, and the username and password for the master console for authentication.

Once you've entered the necessary information, you can click "Finish" and the remote node setup is complete. Installing a remote node on just one system in your secondary location is enough for FrameFlow to begin monitoring all devices in that location, so you're good to go!
Note: If the config utility cannot connect to the main console and the main console system is running Windows Firewall, you may need to add an exception for the port that the FrameFlow interface is running on. If you're experiencing connection issues like this, you can temporarily turn off Windows Firewall to find out if that is the problem you're experiencing before proceeding with the above steps.
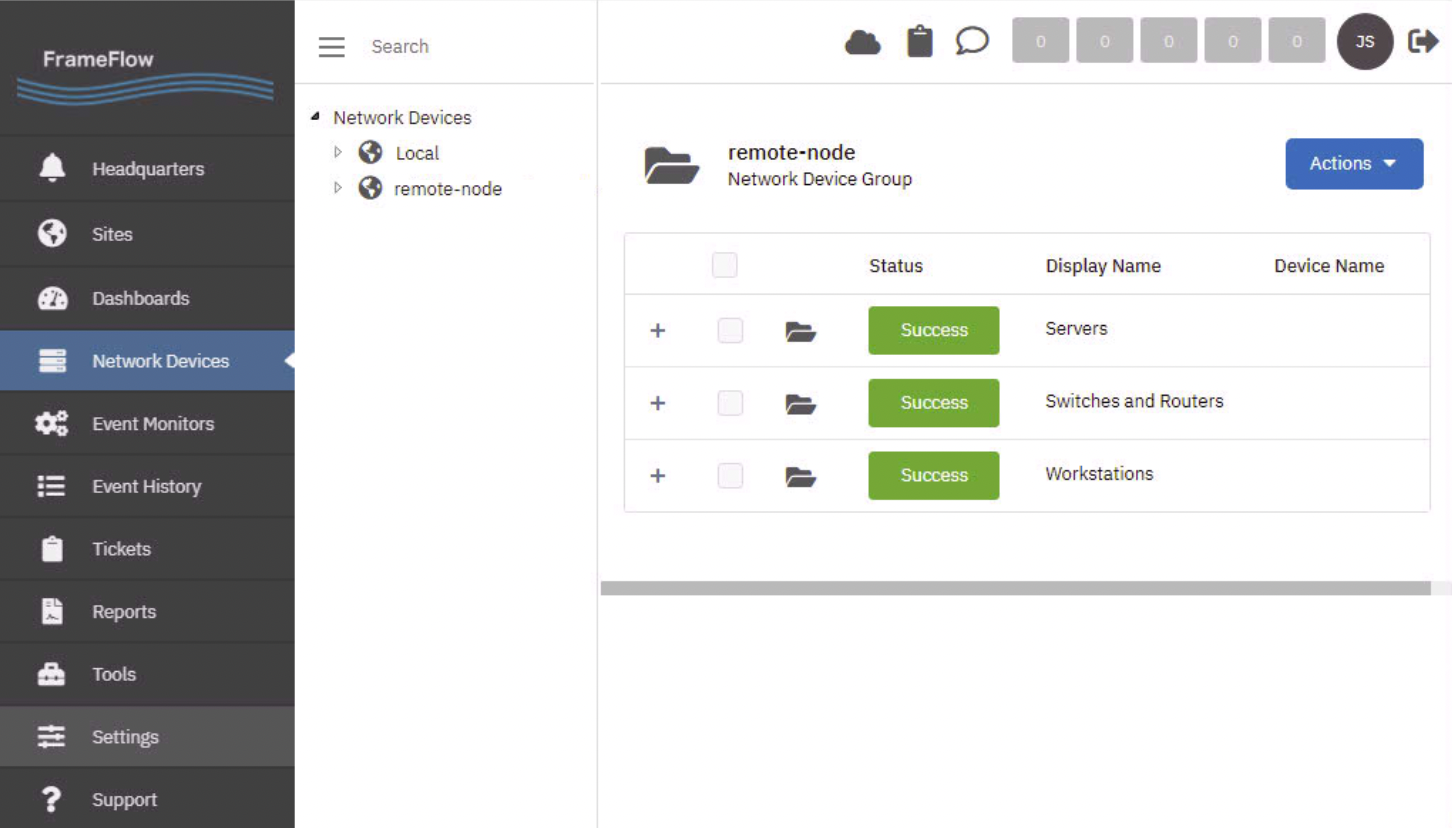
Now that setup is complete, go back to your primary installation and refresh the browser. Across the interface, you'll now see that your network devices, event monitors, dashboards, and more will be separated into folders based on site. There will also be an additional tab on the left-hand side of FrameFlow called "Sites". From here, you can now view and manage your remote sites from one location.

One of the most useful things about the Sites tab is that you can view the system your remote node was installed on using "Computer Name". Because users don't usually have to return to where they installed the remote node, it can be easy to forget where it was installed, so we added a feature to mitigate that.
Compartmentalizing Your Remote Sites
Now that you have a main console and a remote site, you may want to compartmentalize your security roles so that users stationed at one location won't see monitoring data for the other location. Let's go through the steps to configure this compartmentalization now.
In Settings > Login and Security Settings on your master console, create a new group and give it a name that correlates with your new remote site. Assign a role from the dropdown list that will pertain to the site or sites you're allowing members of this group to see or control. Under "Sites", use the chooser to select the sites the group members will be able to access. Use the member chooser to add members to the group, then save.

Now, users who are a member of this security group will only be able to see monitoring data from the locations that are relevant to their work. All other sites will be hidden from the interface.
Summary
Installing remote nodes at each of your secondary locations makes monitoring them all from your headquarters location simple. By following today's steps on just one device in each of your organization's locations, you can monitor global operations on a single FrameFlow interface. Make sure to stop by for tomorrow's lesson, where we cover failover monitoring with FrameFlow.
| Day 27: Installation Health | Day 29: Failover Monitoring |
Table of Contents
Back to Menu
Day 1: Intro and Installation
Day 2: FrameFlow's Interface
Day 3: Network Devices
Day 4: Your First Event Monitors
Day 5: Authentication Profiles
Day 6: Security
Day 7: System Health Event Monitor
Day 8: Event Monitors by Category
Day 9: Headquarters
Day 10: Dashboards
Day 11: Alert Types
Day 12: PowerShell Scripting
Day 13: Event History
Day 14: Reports and Inventory Monitoring
Day 15: Network Monitoring
Day 16: Cloud Service Monitoring
Day 17: Cloud Cost Monitoring
Day 18: Activity Monitoring
Day 19: Maintenance Windows
Day 20: Dependencies
Day 21: VMware Monitoring
Day 22: Benefits of Organization
Day 23: Assigning Device Types
Day 24: Security Best Practices
Day 25: Database Monitoring
Day 26: Hardware Monitoring
Day 27: Installation Health Event Monitor
Day 28: Multi-Site and Remote Nodes
Day 29: Failover Monitoring
Day 30: More FrameFlow Resources